 CyberInstaller
Studio - 3. Package creation
steps
CyberInstaller
Studio - 3. Package creation
steps

Note:
The
creation of an installation package assumes you've completed your
application to schedule and has therefore available to the compiled
executable plus any necessary support files (databases, mages, sound,
online help, components, libraries, etc..), all preferably, but not
necessarily, in a specially crafted folder.
The creation of the package is made in 19 steps
(plus one extra step, omit), which must be completed properly to get
the desired result. Actually, not all steps are
required, but it would always be at least check every step before
creating the package, even if it is assumed the use or non-use of
specific steps for your package. This advice remains valid
even if you use the "New
Package Wizard" for creating an installation package.
Consider
each step of creation:
- General
parameters. This step allows you to define the
general parameters for the installation package, such as package name,
author or manufacturer. It's also possible to set some basic
options that vary significantly the behavior of the installation such
as a Windows restart or turn on the system roll-back.
- Installer
interface. In
this step you can change the
parameters that modify the interface CyberInstaller,
such as transparency effects (windows and/or background), mobility of
the windows, transparent windows, wallpaper display, display of titles
in the background (and size of the latter), and the logo of the author.
- Documentation. In
this step you can modify the documentation files of the package, namely
the two license and readme file, a display before (pre-installation
notes) and one after (release notes) the installation process itself,
and custom claims.
- Data. In
this step you can specify the data (folders and files) that make up the
application to install. These
data will be copied during the installation folder destination chosen
by the end user. Also you can view the target system with changes made
by the package is complete
- Folders. In
this step you can specify: the workbook (ie the
temporary folder where you will create the package), the default
destination folder (the one proposed to the user during the
installation process) and an extra destination folder (useful to ask
user with a possible second location to install special components). It's
possible also specify a list of additional folders that will be created
during installation.
- Details
file. In this
step
you can specify the dependencies and components necessary to allow the
application to function correctly, such as libraries, ActiveX controls,
database, image support, sounds, fonts, etc.. To
help you find the dependencies you can use the tool "Find
Dependencies", able to automatically detect all the
dependencies of a Microsoft Visual Basic, Delphi and from any
executable, so you can select what you want and automatically
integrates into the list of components.
- Font. In
this step you can specify a list of fonts to be included in the
package, including those installed on the system where you create the
installation package.
- Applications
external. In
this step
you can specify a list of applications outside the package that will
run before or after the actual installation process. You
can choose whether to run an application directly
from the target system, or if it stays in the package.
- Package
MSI/MSM. In this
step you can specify a list of packages MSI
(Windows Installer) or MSM (Merge Modules), for inclusion in the
package to use as quickly as possible third-party installer in a single
installation package.
- Keys
and registry values. In
this step you can specify any keys and/or values
to be created in the Windows registry (it is not necessary to have in
your system, you can also create it).
- Association
extensions. In
this step
you can specify a list of extensions to associate with a program. This
will make it possible, after installation, open a
file directly into the program associated with the extension specified
simply by double clicking on this and files.
- Attributes
files and folders. In
this step
you can specify any attributes to be set on files and/or folders on
the target system after installation.
- Links. In
this step you can specify the connections (links or
shortcuts) that you want to create on the destination system. These
links will
serve to simplify the user booting the installed applications.It's
possible create shortcuts in any folder on the target system, but it is
highly recommended to use as target only the Start Menu folder, the
folder to the Startup group, or the Desktop.
- Minimum.
In
this step you can specify the minimum requirements that must have the
system in which the created package will be installed with
CyberInstaller.You
can then specify the version of Windows, memory, processor speed,
available disk space, video resolution and authorized users.
- Software
prerequisites. In this step you can specify the
prerequisites necessary for the proper functioning of the application
software to be installed. These prerequisites should be already present
or not present (choice) in the target system in any way and will not be
installed unless specified otherwise. According
to this may or may not be included in the current installation package,
or downloaded when needed.
- Serial
numbers. In this step you can generate any number
of serial, all different, in order to proceed with the installation.To
continue the
installation the user must enter a valid serial number.
- Languages.
In this step you can select the language(s) which will receive the
installation process.
- Average
output (CD/DVD, web). In this step, you can create
a folder ready to be burned onto CDs, DVDs or other media (with the
possibility of starting automatically insert the disk in the drive), or
automatically create the web page from which to install the package
created by CyberInstaller.
- Executable.
In this step you can specify the name of self-extracting compressed
executable package, containing the installation package.
- Package
creation. This
step compiles the installation package and
creates the media selected in the two previous steps (CD/DVD, web page,
executable file).
- Extra
step.
In this step you can add notes as you wish to document the project also
is a historian of any changes made automatically to the project.
CyberInstaller
Studio - 3.1. Information
on the package in real time
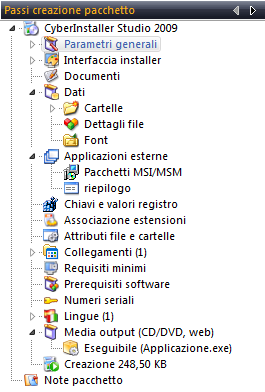
When creating a package, that
is, when you fill in the various steps in order to create, or after
loading a previously saved project, the steps in the navigation pane of
the main
window of CyberInstaller Studio appears
as figure on the left.
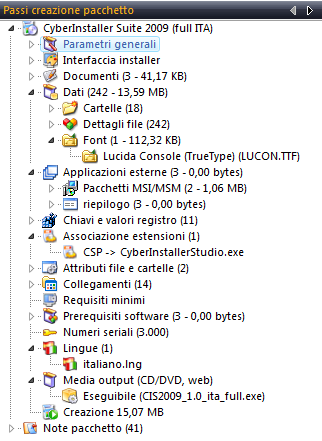
In practice, when information is added to the
package, the description of the corresponding step is updated in real
time with additional data, such as number of items inserted and the
total size, in bytes, of data entered in that particular step.The last step, namely on the
creation of the package, always shows the total size of the package is
not compressed.
Consider the figure shown
here at left, with a quick glance at the information listed next to the
description of the steps, we see how the documents were entered 3
documents for a total 41.17 KB, 18 folders have been included, the data
of 'application are around 242 for a total of 13.59 MB, 3 external
applications, 14 connections and 1 speech.Also you can clearly see the
last step as the total package of the project under consideration has a
size of 15.07 MB in total.
Probably you will
notice that the sum of the bytes of the individual steps and the total
size of the package is not the same, this is because the sum total
package CyberInstaller Studio
also the size of CyberInstaller,
incorporated in the package at the time of creation.
For since CyberInstaller
the installer/uninstaller itself should be added to the final package,
hence its size will add up to.
Read the information on the
package directly with a simple glance at the navigation panel is
essential to always have an eye on how the package will be created and
the size (uncompressed) that it will have.
For more detailed
information on the current package, you can use a tool dedicated to CyberInstaller Studio,
which in a separate
window displays a tree similar to that of the navigation pane
and when clicking on various nodes (represented by the steps of
creation) will display detailed information on all elements at every
step.
 See
also ...
See
also ...
 Main
window CyberInstaller
Studio
Main
window CyberInstaller
Studio
Step
1: General Parameters
Step
2: Interface
CyberInstaller
Step
3: Documentation
Step
4: Application Data
Step
5: Folders
Step
6: File Details
Step
7: Fonts
Step
8: External Applications
Step
9 Packet MSI/MSM
Step
10: Keys and values of
log
Step
11: Association
extensions
Step
12: File and Folder
Attributes
Step
13: Links
Step
14: Minimum
Step
15: Software
prerequisites
Step
16: Serial numbers
Step
17: Languages
Step
18: Output Media
Step
19: Executable
Step
20: Creating package
Extra
Step: Notes Package
Package
details