![]() CyberInstaller
Studio - 52. Step
18: "Media
Output"
CyberInstaller
Studio - 52. Step
18: "Media
Output"
In this step you can tell CyberInstaller
Studio which output created during the process of package creation.
At
the end of the process of
creation itself, indeed, the package will be processed in the form
selected in this step (including the underpass
"executable").
The
media output are:
- Burn folder (ready to be burned to CD/DVD, boot automatically after inserting the disc into the drive and custom icon)
- Web page with a link to download the executable package (with custom style)
- Self-extracting
compressed executable
(with a custom icon)

Note:
You
can select all three forms of output available, it is not possible not
to use any of at least one must be enabled, otherwise the packet will
not be created (see a signal blocker). In addition, you can choose
only the web page as the average output, since for this mode, you must
also create the self-extracting
executable, because the download link will point to the
executable package.
![]() CyberInstaller
Studio - 52. Step
18: "Media Output" - CD/DVD-ROM
CyberInstaller
Studio - 52. Step
18: "Media Output" - CD/DVD-ROM
 Settings for the
preparation of a folder containing the installation package, ready to
be burned through a third-party software.
Settings for the
preparation of a folder containing the installation package, ready to
be burned through a third-party software.
Once
burned to disk
the folder you created, the installation will run automatically when
the disk is inserted in the drive, the disc also has an icon selectable
at will.
Note
CyberInstaller
Studio does not directly burns the folder you created.
Burning
package on removable optical media -
Default: No
Folder in which to copy the data to be burned
Default folder in which you will copy all files in the package. The folder will then be prepared to be referred to burn through third-party software.Autostart installation - Default: Yes
Causes, burning the folder to CD/DVD or other removable media, the installation is done automatically (you will create a special file autorun.inf). Also true enabled the "disk image".![]() CyberInstaller
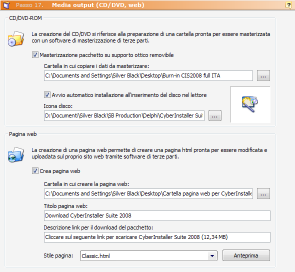
Studio - 52. Step
18: "Media Output" - Website
CyberInstaller
Studio - 52. Step
18: "Media Output" - Website
Create web page - Default: No
By checking this option will enable the options for the creation of web page downloads.
Folder in which to create the web page
Folder where the html file will be created and placed the self-extracting executable file containing the installation package itself. The user, click on the download link (created automatically in the html page), will begin the downloading of the executable package.Title page
Title that will be assigned to the web page created. This title apprirà in the title bar of the browser of users reaching your webpage browsing the site in which it was placed.Description link to download the package
Description of the link will start the download package. This description will appear just before the download link, in order to alert the user with any additional information.Page Style - Default: Classic.html
From this list you can choose the layout of the web page among those proposals (Classic, Elegant CyberBlue, elegant portals big full-centered, elegant portals big, elegant portals, Elegant, Standard Black, Standard). It's possible add additional styles simply prepare the HTML pages with the appropriate placeholder (see this page for any purpose other styles) and place it in "installation <Windows CyberInstaller Suite>\Studio\Media\HTML Templates".
![]() See
also ...
See
also ...