![]() CyberInstaller
Studio - 9. Step
4: "Data"
CyberInstaller
Studio - 9. Step
4: "Data"
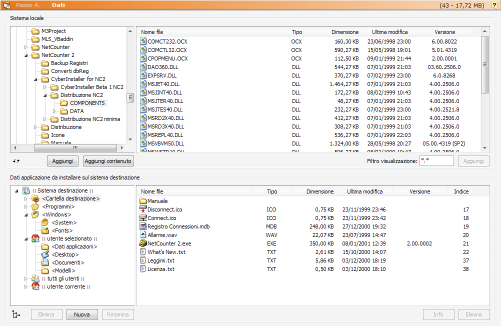
In this step you can specify the data (folders and files) that make up the package. These data will be copied into the target system being installed in the user folder indicated.
The inscription at the top
right indicates the number of files entered and the weight in bytes for
the current package.

Note: The
creation of an installation package assumes you've completed your
application to schedule and has therefore available to the compiled
executable plus any necessary support files (databases, images, sounds,
online help, components, libraries etc..), all preferably (though not
necessary) in a folder made up.
![]() CyberInstaller Studio - 9.1. Add
items (file/folder) to the package
CyberInstaller Studio - 9.1. Add
items (file/folder) to the package

This step is essential for creating the package, since it indicates a CyberInstaller Studio data (ie files and folders) that make up the software to distribute. Each file and folder you want to distribute, which you wish to be present on the target system at the end of the installation process, will be visible in this step (except for empty folders that can be created through step 5 "Folders").
These data are the main executable file (obtained by compiling the source code from the environment used to develop the software), any other executable file (separate modules), documentation (text file, html, hlp, chm, etc.. ), any other resource files (sound, images loaded at run-time database used files. res, etc.). and of course the components of the software (ie the files needed for its proper operation and dependencies of all executables included, not just the main one).
First you must choose a destination folder in the system, otherwise you can not add a file.It's possible select from the following folders (in the target system):
| <Windows> | folder selected/confirmed by the user when the installation will be performed |
| <Program Files> | folder "Programs" system (which are usually installed applications) |
| <Program Files> \ <File Comuni> | system folder containing the shared files that are referenced more applications installed |
| <Windows> | folder in which Windows is installed |
| <Windows> \ <System> | system folder in which the key drivers are installed or shared components (libraries and ActiveX) |
| <Windows> \ <Fonts> | folder where you installed the fonts system |
| .. \ <Data Applicazioni> | folder
where you saved the settings (data, db, ini, etc.). relative to a
specific application (per user) |
| .. \ <Desktop> | folder that represents the user's desktops |
| .. \ <Documenti> | folder containing the user's files |
| .. \ <Modelli> | folder containing the application templates (per user) |
![]() Note:
You can not choose as destination folder for a file to add a folder
whose identifier begins with "::", select a sub-node. It's possible create new
folders to be selected later as a destination, but not in folders that
begin with "::".
Note:
You can not choose as destination folder for a file to add a folder
whose identifier begins with "::", select a sub-node. It's possible create new
folders to be selected later as a destination, but not in folders that
begin with "::".
If you want to
put files in the destination chosen by the user, you must select the
folder named "<Windows
destinazione>" and not "<Program
Files>" even if the destination is located in Program Files
folder (we used the patten
|$ProgramsPath$|). The folder "<Windows
destinazione>" is recommended in most cases,
possibly by creating subfolders within it.
The last four folders listed
in the table refer to the selected user and are subfolders of the
latter.
 After selecting the desired destination folder
(after you've created and possibly renamed, if it is a subfolder of "<Destination
Folder>"), you can navigate on your system, looking
for the file or folder to be included, using the panel in the upper
left. From the right panel
you can then select the file/folder and press the button "Add" to add
the package (in the selected folder). Alternatively you can select
multiple items, use the CTRL key while you click on files/folders, or
the Shift key to highlight groups of files/folders at once contiguous. As an alternative to
"Add" button you can click with right mouse button on selected items
and select the appropriate item to add to the package.
After selecting the desired destination folder
(after you've created and possibly renamed, if it is a subfolder of "<Destination
Folder>"), you can navigate on your system, looking
for the file or folder to be included, using the panel in the upper
left. From the right panel
you can then select the file/folder and press the button "Add" to add
the package (in the selected folder). Alternatively you can select
multiple items, use the CTRL key while you click on files/folders, or
the Shift key to highlight groups of files/folders at once contiguous. As an alternative to
"Add" button you can click with right mouse button on selected items
and select the appropriate item to add to the package.
 The inclusion of a folder within the files, or
sub-folders containing other files themselves, or other sub-folders,
will result in the addition of the entire folder structure correct
destination in the system, then the installation package will contain
exactly the folder structure inserted, thus ensuring an exact
reproduction. This system ensures exact synchronization with the
sub-steps "Folders" and "File Details" means, in practice
any changes will be reflected in this passage about the other two next
steps (sub-steps of this) and vice versa.
The inclusion of a folder within the files, or
sub-folders containing other files themselves, or other sub-folders,
will result in the addition of the entire folder structure correct
destination in the system, then the installation package will contain
exactly the folder structure inserted, thus ensuring an exact
reproduction. This system ensures exact synchronization with the
sub-steps "Folders" and "File Details" means, in practice
any changes will be reflected in this passage about the other two next
steps (sub-steps of this) and vice versa. ![]() CyberInstaller
Studio - 9.2. Buttons
and control elements
CyberInstaller
Studio - 9.2. Buttons
and control elements
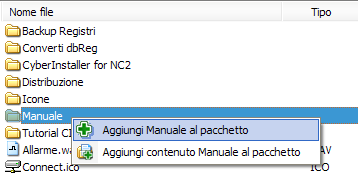
Adds the selected folder to the package, with all its contents (subdirectories and files).
Add Content [button upper left panel]
Only adds to the package contents of the selected folder (files and sub-folders).Add [button upper right panel]
Adds to the package selected item (if the entire folder is a folder, including its contents).
Filter display [field upper right panel]
Allows you to specify a type of file (its extension), to display only files of that type. Ex.: *. exe, *.*, *. txt, etc..Delete [Button bottom left panel]
Deletes the selected folder. All the contents (any sub-folders and files) will be removed. You can not delete system folders (those that begin with "::" or "<"), since it is only placeholder.New [button lower left panel]
Create a new folder with unique name (automatically assigned) within the selected folder.Rename [button lower left panel]
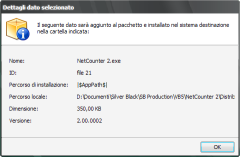
Rename the selected folder with a name of your choice.Info [bottom right panel button]
View details about the selectedDelete [bottom right panel button]
Delete the selected item. If you delete a folder all its contents (if any sub-folders and files) will be removed.![]() Note:
Instead of the buttons listed, you can use the context menu (pop-up) on
the list. This menu is activated by a
right-click on the item concerned. This has the advantage that, in
editing and elimination, there is a greater certainty of having chosen
the item you want and work exactly that item, as well a technique to be
far more rapid.
Note:
Instead of the buttons listed, you can use the context menu (pop-up) on
the list. This menu is activated by a
right-click on the item concerned. This has the advantage that, in
editing and elimination, there is a greater certainty of having chosen
the item you want and work exactly that item, as well a technique to be
far more rapid.
Present in all lists CyberInstaller Studio
have a context menu activated by right mouse button, which permtette to
achieve common tasks permitted for the corresponding list.
![]() CyberInstaller
Studio - 9.3. Additional
Features
CyberInstaller
Studio - 9.3. Additional
Features
There are an additional feature for the complete management of this step, which is not fully visible in the GUI, why not trade at or from the buttons, or via pop-up menus (the menus that appear by using the right mouse button).
Resizing panels
It's possible resize the
panels interface of this step simply by dragging the divider bar
between the panel and the other. E' can resize the two panels at the
top, horizontally. The same for those
below. It's possible also
resize panels vertically moving the mouse pointer between the two
panels (bottom and top) and dragging it as soon as it changes shape.
![]() CyberInstaller
Studio - 9.4. Activities
current step
CyberInstaller
Studio - 9.4. Activities
current step
Delete data do not exist
on the package removes all data (files/folders) that no longer exist on
the local system (eg. Because they have been moved or renamed, or
because the package was imported from another system, or because the
package was originally created on another system). The data do not exist
must be removed because otherwise the packet could not be created (CyberInstaller Studio
would not know where to pick up the file to be included).
![]() See
also ...
See
also ...
![]() Main
window CyberInstaller Studio
Main
window CyberInstaller Studio