![]() CyberInstaller
Studio - 12. Step 6: "File
Details"
CyberInstaller
Studio - 12. Step 6: "File
Details"
This step lists all
the files added to the step "Data"
with the installation options that characterize them.
This step is a sub-step of step
"Data" and therefore is almost never necessary to insert a
file manually, but it is advisable to do so solely through the step "Data".
To help you find the dependencies you can use the "find employees", can automatically detect all the dependencies of a Microsoft Visual Basic, Delphi,. Net and from any executable, so you can select only the desired files and automatically integrates the list of components of the package.
The inscription at the top
right indicates the number of components included and the total weight
in bytes for the current package.
![]() Note: Do not
make the mistake of confusing the components of a
software with the files of their software. Indeed, while the
latter correspond to the files that make up the application (thus
created and/or assembled by the developer of the software), the
components are all the files needed to outline
the proper functioning of the software. These components (also called
dependencies) can be files of third parties (for example, ActiveX, OCX,
software libraries for the technologies adopted in software
development, etc..), But also support files such as images (icons,
bitmaps, etc. .), sounds, databases, etc.. without which the software to
be distributed will not work correctly. All of these files can be inserted through the step "Data", which allows, through
a consistent interface, to have on hand the whole package and see how
your target system is complete.
Note: Do not
make the mistake of confusing the components of a
software with the files of their software. Indeed, while the
latter correspond to the files that make up the application (thus
created and/or assembled by the developer of the software), the
components are all the files needed to outline
the proper functioning of the software. These components (also called
dependencies) can be files of third parties (for example, ActiveX, OCX,
software libraries for the technologies adopted in software
development, etc..), But also support files such as images (icons,
bitmaps, etc. .), sounds, databases, etc.. without which the software to
be distributed will not work correctly. All of these files can be inserted through the step "Data", which allows, through
a consistent interface, to have on hand the whole package and see how
your target system is complete.
All files inserted through the step "Data" (or a complete those
inserted one at a time in this step) may be associated with certain
parameters (such as maintaining records, or their copy mode), without
which they could not be installed correctly .
This passage presents
the list of components and libraries included in the current package.
This list is divided
into 11 columns:
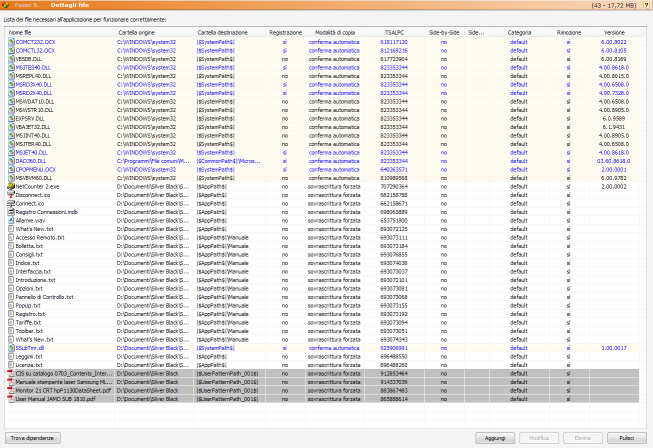 File name:
full name of the file (on the development system). If the file does not exist will not be added to the
package.
File name:
full name of the file (on the development system). If the file does not exist will not be added to the
package.
Sources folder: Full path of the file on the system development.
Destination folder: destination folder on the system where you will install the corresponding component. It's must use the patterns to refer to folders on the destination system. The most common destination is the directory in which you installed the software ("|$AppPath$|"), the Windows folder ("|$WinPath$|") and the system folder ("|$SystemPath$|") .
Registration: indicates whether the corresponding component must be registered or not during the installation process. The registration of a file is needed only in special cases (OCX, ActiveX and libraries) and is an operation that informs the operating system on the file location. Without registration, the files that need not be used and, although the installation is successful, the software will not work correctly. CyberInstaller Studio automatically detects if a file requires registration, but the method used is not infallible and some cases (though rather remote) is required to correct this manually.
| Normal |
the decision to
overwrite any files already present on the same target system will be
entrusted to you (which is still a proposal recommended based on the
version of the file) |
| automatic
confirmation |
the decision to overwrite any files already present on the same target system will be made automatically based on the version of the file |
| Always
Overwrite |
a file already on your system, possibly the same destination will be overwritten in any case |
| not
overwrite ever |
a file already on your system, possibly the same target will never be overwritten |
TSALPC: Time Stamp At Last Package Creation. Indicates the timestamp (date and time in the format recognizable by the operating system) will last when creating the package. CyberInstaller Return to Studio to know which files have been changed since creation of the package to create an update package.
![]() CyberInstaller
Studio - 12.1. Colors
in the list of components
CyberInstaller
Studio - 12.1. Colors
in the list of components
The files included in the list is colored according to the settings set, so as to recognize at a glance how the installation of each component:
| cream-colored background | component to be installed in folder other than for (|$AppPath$|) and any subfolders, the folder destinaizone extra (|$UserPatternPath_001$|) and that the documents the user selected (|$DocumentsPath$|) |
| blue background | component to be installed in the user's My Documents folder selected (|$DocumentsPath$|) |
| gray | component to be installed in the target extras (|$UserPatternPath_001$|) |
| black background, white text | component without any pattern of system |
| blue text | component record |
| red text | component to be installed side-by-side |
| red background, white text, bold | component does not exist on the local system (can not create the installation package) |
![]() CyberInstaller
Studio - 12.2. Interface
Controls
CyberInstaller
Studio - 12.2. Interface
Controls
Find dependencies [button]
Open the dependency is built which allows to detect all the components, libraries and any other supporting files from the source project (Microsoft Visual Basic, Borland Delphi,. Net - any language) or directly from the executable compiled. Once detected dependencies and select the one you want to add to the package, they will be automatically inserted to the list.
![]() Note:
The search for such components will need a software is often difficult
and complex, CyberInstaller
this study
is to help developers with the tool find
employees who will try to detect automatically all the
necessary components to their software, starting from the source
project ( in Visual Basic, Delphi, in any language. Net) or directly
from the executable. Unfortunately, this tool (like other similar
software) is often not 100% accurate, especially when the analysis is
completed as from thIt's executable, and it could happen that are
reported as dependency files are not strictly necessary or that are not
reported but other files necessary/useful. The complexity of the operation is compounded by
the possible misinterpretation of parameters to bind to components,
such as the need to register or not. All this leads to
having to test as much as possible their installation packages on
several different software configurations, and is often necessary to
proceed by trial and error before he could produce a package working
perfectly under all conditions.
Note:
The search for such components will need a software is often difficult
and complex, CyberInstaller
this study
is to help developers with the tool find
employees who will try to detect automatically all the
necessary components to their software, starting from the source
project ( in Visual Basic, Delphi, in any language. Net) or directly
from the executable. Unfortunately, this tool (like other similar
software) is often not 100% accurate, especially when the analysis is
completed as from thIt's executable, and it could happen that are
reported as dependency files are not strictly necessary or that are not
reported but other files necessary/useful. The complexity of the operation is compounded by
the possible misinterpretation of parameters to bind to components,
such as the need to register or not. All this leads to
having to test as much as possible their installation packages on
several different software configurations, and is often necessary to
proceed by trial and error before he could produce a package working
perfectly under all conditions.
To minimize the number of
failures can read up on the technologies used during the development of
software to distribute and files needed for its proper installation. Every programmer should in
fact be fully aware of what is included during the planning application
in your development environment, and according to the manufacturer's
documentation of the technology used (or third-party components used)
to include in the installation package necessary files.
Add [button]
Allows you to manually enter
a component, via the "Add Component"
which allows you to specify all the parameters needed for its proper
installation. It's advisable, however, do not use this button to
add data to the package, but to use instead of the step "Data".
Edit [button]
After selecting a component previously added to the list, you can use this button to change the values.
This same result is obtained by double-clicking the item you want.
Delete [Button]
Deletes the list item selected. Asks for confirmation.
Clear [button]
Delete all elements of the list. Asks for confirmation.
![]() Note:
Instead of the buttons Add, Edit, Delete and Clear, you can use the
context menu (pop-up) on the list. This menu is
activated by a click with right mouse button on the list. This has the advantage that,
in editing and elimination, there is a greater certainty that you have
selected the item you want and operate exactly the item you want.
Note:
Instead of the buttons Add, Edit, Delete and Clear, you can use the
context menu (pop-up) on the list. This menu is
activated by a click with right mouse button on the list. This has the advantage that,
in editing and elimination, there is a greater certainty that you have
selected the item you want and operate exactly the item you want.
Present in all lists CyberInstaller Studio
have a context menu activated by right mouse button, which allows to
achieve common tasks permitted for the corresponding list.
Pay particular
attention to the fact that it is almost never need to manually add
files by this step, but you should do so only through the step "Data" which allows a more
consistent management of the files included in installation package. The sub-steps "Detail
Data" and "folders" are
perfectly synchronized with the step
"Data", the one that should be used to add files and folders
to the installation package.
Pressing the right button of mouse on any item, you have a series of additional actions:
Add Component
Allows you to manually enter
a component, via the "Add Component"
which allows you to specify all the parameters needed for its proper
installation. It's advisable, however, do not use this button to
add data to the package, but to use instead of the step "Data".
Edit component [component name]
It's possible use this option to change their
values.
Delete component [component name]
Deletes the list item selected. Asks for confirmation.
Clear
Delete all elements of the list. Asks for confirmation.
Side-by-Side
See the appropriate column.
Removal:
See the appropriate column.
Move:
Allows you to change the
destination folder of the file(s) selected.
Find dependencies [button]
Open the dependency is built which allows to detect all the components, libraries and any other supporting files from the source project (Microsoft Visual Basic, Borland Delphi,. Net - any language) or directly from the executable compiled. Once detected dependencies and select the one you want to add to the package, they will be automatically inserted to the list.
![]() CyberInstaller
Studio - 12.3. Activities
current step
CyberInstaller
Studio - 12.3. Activities
current step
Open find employees: Opens the Find Dependencies.
![]() See
also ...
See
also ...