 CyberInstaller
Studio - 41. Application
Wizard
CyberInstaller
Studio - 41. Application
Wizard
Clicking on the menu File/New/"New Project Wizard
or by using the model "New
Package" from the window "New
Project" opens the window" New Project Wizard,
which will create a new project by a wizard that will assist you in 5
easy steps, the rapid creation of a package of basic installation.
Using this wizard is
especially recommended for less experienced users, since it will create
a working package quickly and safely. After using the wizard, once
the project with the new settings will be created, you can use at any
time CyberInstaller Studio
for editing using full potential.
The wizard is still recommended even for
experienced users to create a working package in a few seconds.
This tool is also activated
at any time by simply pressing keys <Ctrl
+ W>.
The wizard presents a
classic structure: a step appears at a time, to enter the next step,
simply click on "Next"
button to return to previous step usually use "Back" button. The "Finish" button,
if present, indicates that, when clicked, all data entered in the
wizard will be used to create the package.
The Close button ends
the wizard with no changes (no action will be taken), the button "?" open this online
manual to this page.
CyberInstaller
Studio - 41.1. Step
1: General Information Package
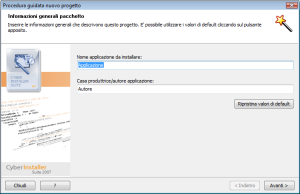 The first step of the wizard, the new project:
General packet.
The first step of the wizard, the new project:
General packet.
Here you can enter
the basic data that identifies the installation package, such as name
and author.
Name
application to be installed [field]
- -- Eg:
"EasyBudget"
Software title that will be distributed.
Some programs include
the version number in the title of the software, others prefer to omit
it. Text entered here is
essential and will be used by CyberInstaller
Studio for the package/current project (for example, as the
name you give the file the first rescue plan, it is suggested the text
"Application"). In addition to the end user will be shown during
the installation process, which then will refer to this text in order
to know the name of which is about to install.
Note:
Do not use the following characters: \ /: *? "<> |
This same
functionality is at step 1 "General
Parameters" on the main interface.
Manufacturer/author
application [field] - Example:
"Silver Cybertech"
Author's name or the
software company that distributes software that will be distributed.
The input text is crucial, as will be shown to the
end user during the installation process and consequently they will
refer to this application for the dealer who is about to install.
This same
functionality is at step 1 "General
Parameters" on the main interface.
Reset to
default [button]
Fill in the fields with
default values for the creation of a new draft standard (see Options/Defaults/Main).
CyberInstaller
Studio - 41.2. Step
2: Project source dependency analysis
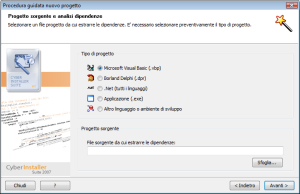 The second step of the wizard, the new project:
Project source dependency
analysis.
The second step of the wizard, the new project:
Project source dependency
analysis.
Here you can put the
project source files of their software that you want to distribute.
Option type of project
[options
box]
Type of project
source. Select type corresponding to
the language/development environment used to create the software you
want to distribute. It's important to be able to tell CyberInstaller
study how to extract the correct
dependencies. E' can select a project: Microsoft Visual Basic (*. VBP,
*. VBG), Borland Delphi (*. dpr). Net (all languages - *.* proj),
Application (*. exe), other language or development environment. Select a project. Net, you can then select the
version of the framework .NET uses: 1.x, 2.0, 3.0, 3.5.
File source
project [field] - Eg:
"E:\My Documents\<username>\Visual Basic 6\EasyBudget.vbp"
Full file name that
represents the project's source software you want to distribute. The type of project is for
the option selected.
Browse
[button]
Click to open the Open
dialog that allows you to select the project source. The
extent and then the files displayed will be related to the option
selected above (type of project source).
Step
3: File Application (Data)
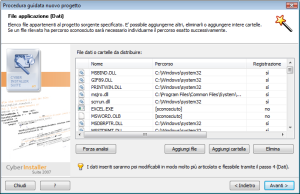 The third step of the new project wizard:
File Application (Data).
The third step of the new project wizard:
File Application (Data).
Here you can enter all user files, or even entire
folders, that will be distributed with the package.
NOTE:
The information entered here will then be edited in a much more
articulated and flexible through step
4 "Data" of CyberInstaller Studio.
Data files
or folders to be distributed [list]
Here is the files and/or folders added to the
package. All entered data will be
copied to the destination folder. Here there are
normally inserted component files or
dependencies, as they will automatically be collected at the
end of the wizard, depending on source
project selected in the previous step.
Note:
do not mention the main executable file, because even if it is copied
to the destination
folder is
automatically detected according to the source project selected in the previous step.
Force
analysis [button]
Click to force the automatic
recalculation of all the necessary files. Useful in case of erroneous
removal or think that the current review is inaccurate.
Add file
[button]
Click to open the Open
dialog that allows you to select a file to add. It's possible select
any file. It's possible repeat the operation several times to
enter all the desired files. You can add additional files in a much
more flexible (by selecting them all together or in groups) through the
4 step "Data".
Note:
do not mention the main executable file, because even if it is copied
destination
folder Is detected automatically
based on
source project
selected in the previous step.
Add Folder
[button]
Click to open the window "Browse Folders"
that will allow you
to select a folder whose contents will be added to the package. It's possible to
repeat the operation several times to enter all the folders you want. You can add additional folder
structures/sub-folders in a much more flexible through step 4 "Data".
Note:
Do not add folders if the files will be identified automatically based
on source project
selected in the
previous step. Do not add the folder whose contents you do not want to
be copied to the destination
folder.
Delete
[Button]
Click to delete the selected item from the list. The item will be removed and
not added to the package.
CyberInstaller
Studio - 41.3. Step
4: Destination folder
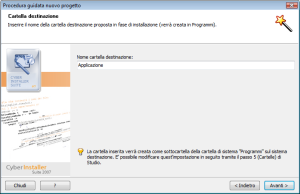 The fourth step of the wizard, the new project
is: Destination folder.
The fourth step of the wizard, the new project
is: Destination folder.
Here you can enter the name of the destination folder you want to
propose to the user during installation. This
is the folder where the files are copied to the main installation
package (ie all files whose target is indicated by the pattern "|$AppPath$|").
Note:
The folder entered by this step of the wizard is always created as a
subfolder of the System Programs "on the target system. It's possible change this
setting later through step 5 "Folders"
to CyberInstaller Studio.
Destination
folder name [field] -
Example: "EasyBudget"
Destination folder
name. You can not use an
absolute path (C:\ ...), but only a single folder name. This is because in this
wizard the target directory specified will always created as a
subfolder of "Programs" and you can not refer to any other folder. The default is the package
name given to the step 1
of that wizard.
Note:
to have full control of the destination folder and be able to specify
any value (absolute paths, use any pattern,
etc..) Use the
step 5 "Folders" to
CyberInstaller
Studio.
CyberInstaller
Studio - 41.3. Step
5: Links
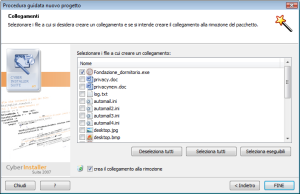 The
fifth step of
the wizard, the new
project is: Links.
The
fifth step of
the wizard, the new
project is: Links.
Here you can decide which files you put in step 3 to create a shortcut in the Start Menu of
Windows.
Select the
files that create a shortcut [list]
You will only list
the files included in step 3
to be placed in the destination folder (pattern
"|$AppPath$|").
Default is selected only executable files. To select a file (and then
create a shortcut to that
file ) just click on the checkbox to the left of the file itself, so
that it is checked.
Uncheck All
[button]
Click to clear
(remove the check mark) all files that appear listed in the list.
Select All
[button]
Click to select (put
a check mark) all files that appear listed in the list.
Select
Executable [button]
Click to select (put
a check mark) automatically executable files (. Exe).
Create a
link to the removal of the package [checkbox]
Select whether you want to be added automatically link to the removal of the package
to the Start Menu.
At this step you can click on "Finish" button to
close the wizard composition, save all changes and use the data entered
to create the installation package. This will be created based on parameters collected. After closing the wizard you will find the
interface composition of classical CyberInstaller Studio,
where you can make changes for the package you just created, to ensure
that accurately reflects their needs.
 See
also ...
See
also ...
 Menu
Menu
Options
Find
employees
Step
1 - General parameters
Step
4 - Data
Step
5 - Folders
Step
13 - Links