![]() CyberInstaller
Studio - 31. Options
CyberInstaller
Studio - 31. Options
Clicking on the menu Tools/Options will open the Options window, allowing you to configure CyberInstaller Studio depending on your tastes and needs. Also allow you to set the default values to use with each new project.
![]() Note: The
options will be changed only when pressing the button "OK". Clicking that button
the options are saved in the file "CONFIG.DAT,"
sits in the data user currently logged to the system in a sub-folder
"CyberInstaller Studio <version>" es. "C:\Documents and
Settings\silver Black\Application Data\CyberInstaller Studio 2008. In the absence of that file
will use the default settings.
Note: The
options will be changed only when pressing the button "OK". Clicking that button
the options are saved in the file "CONFIG.DAT,"
sits in the data user currently logged to the system in a sub-folder
"CyberInstaller Studio <version>" es. "C:\Documents and
Settings\silver Black\Application Data\CyberInstaller Studio 2008. In the absence of that file
will use the default settings.
It's possible at any time press <ESC>
or "Cancel" to close the window without saving changes.
This
tool is also activated at any time by simply pressing the buttons
<CTRL+O>.
![]() CyberInstaller
Studio - 31.1. Use
CyberInstaller
Studio - 31.1. Use
The Options window is presented with a split into two panels: in the left is the navigation menu, in the right options on the selected section.
The main navigation tree consists of the following main sections: General, Paths, Default, Medium Output, Confirmations, Personalize, License.
Some of these sections may include a sub-section.
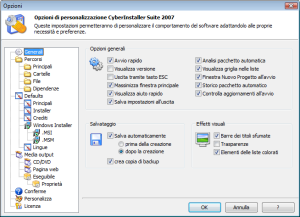
Options that modify the overall behavior of CyberInstaller Studio, its interface (graphics, etc.). And the method of rescue.
In the General Options group we find the following options:
Quick Start
-
Default: Yes
Start CyberInstaller Studio without waiting a few seconds to let you read the spash-screen (this window is displayed when loading the program), which will be closed immediately after loading.
View version - Default: No
Brings up the full
version of Studio
CyberInstaller the license in his possession on the title bar
of the main window, next to
the main title.
Exit via ESC
key -
Default: No
To get out CyberInstaller Studio by simply pressing <ESC>. In any case, you can always go through the voice menu File/Exit.
Maximize main window
-
Default: Yes
Start CyberInstaller Studio with the main window already maximized, so that it occupies the entire portion of the screen available. Otherwise the window will be displayed in small sizes.
Show Quick Help - Default: Yes
Show Help in the pane in the main window of CyberInstaller Studio. The help is contextual, based on the step currently selected. If this option is not enabled, you will have more space available for the current step.
Save Settings on Exit - Default: Yes
Exiting CyberInstaller study changes to the main window will be saved to be restored automatically the next time (eg the size of the columns of the list). Otherwise they will be ignored.
Automatic analysis package - Default: Yes
Enables real-time
analysis in the lower panel main
interface of CyberInstaller
Studio. If this option is not enabled the analysis is not
done in real time, so the list of alerts will remain empty and to
analyze the packet must have recourse to the instrument of analysis package.
Show grid on the lists
-
Default: No
Displays a grid on
the list of CyberInstaller Studio.
New Project dialog
box at startup - Default: Yes
Show the window for a
new CyberInstaller
study project if unchecked. Otherwise it will be prepared an empty project.
Historic package
automatically - Default: Yes
Update the history of
changes to the project.
Check for updates at
startup - Default: Yes
Check if there is an updated version of any of the modules that make up CyberInstaller Suite from the official site.
In the group Save are:
Automatically save
-
Default: Yes
CyberInstaller Studio automatically saves the project under the two following options.
Before the creation: - Default: No
Automatically save your project before creating the package.
After the creation: - Default: No
Automatically saves the project after creating the package.
Visual effects in the group includs:
Shaded title bars - Default: Yes
Display the title bars of the panels CyberInstaller Studio owner with an image from the colors blurred, otherwise it will receive the system color set.
Transparencies - Default: No
Enable transparency effects in CyberInstaller Studio. This means that when a window is in the background is translucent. The option in question, when enabled, slows systems do not last generation and is not recommended if you use integrated graphics chip.
List elements colored - Default: Yes
Enables the color of the elements of listings CyberInstaller Studio (step 6 "File Details").
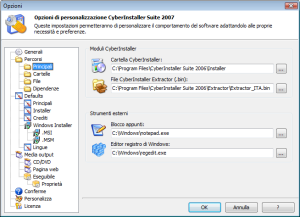
Options that set the default paths used by major CyberInstaller Studio.
Folder CyberInstaller - Example: "C:\Program Files\CyberInstaller Suite 2008\Installer"
Folder where you installed CyberInstaller (there must be its main files: Setup.exe, CyberUninstaller.exe, Regist10.dll, Vb6stkit.dll and at least one file. Lng). Using the installation of the complete package of CyberInstaller Suite, this field is automatically filled in correctly, but you can always edit it, using the "Browse" button corresponding to use a version of CyberInstaller different (and can then be installed on several versions of CyberInstaller your hard disk, and use the preferred time to time simply by changing this field).
File CyberInstaller Extractor (. Bin) - Example: "C:\Program Files\CyberInstaller Suite 2008\Extractor\ Extractor_ITA.bin"
File extension "bin" to be used as an engine of self-extracting package. Using the installation of the complete package of CyberInstaller Suite, this field is automatically filled in correctly, but you can always edit it, using the "Browse" button corresponding to use a version of CyberExtractor different (and can then be installed on several versions of CyberExtractor your hard disk, and use the preferred time to time by modifying this field, for example if you want to use the version with user interface in English rather than Italian).
Notebook - Example: "C:\Windows\Notepad.exe"
Full path to the executable file that you want to use as a text editor (to modify the documentation files, for example).Windows Registry Editor - Example: "C:\Windows\Regedit.exe"
Full path to the executable file that you want to use the registry editor in Windows.
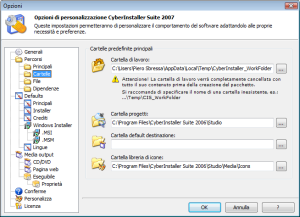
Options that set the default
values relative paths to the folders used by CyberInstaller Studio
(see also Step 5 - Folders)
Folder of work - eg "C:\Documents and Settings\<Username>\Local Settings\Temp\CyberInstaller_WorkFolder"
Default path of the workbook (temporary) used by CyberInstaller Studio. Please note that the workbook is temporary, and as such will be used only when creating the package, then will be automatically removed (unless otherwise specified in the menu Output Media -> Executables of the Options window). It's possible vary for each project using the step 5 "Folders".
Design handbook - Example: "C:\Documents and Settings\<Username>\Documents\Projects CyberInstaller Studio"
Folder that will aim to open the Open dialog box/Save if it refers to a field already exploited by the name of a file (in this case the window will point to the folder indicated by the path of the file). Usually you use the value entered in this field to point them to the folder containing the saved project (. csp) in order to achieve them as quickly as possible, but nothing prevents you to specify any other folder.
Default destination folder - Example: "|ProgramsPath|\ Application"
Default location of the folder used as the proposed destination user during installation. It's possible vary for each project from step 5 "Folders".
Folder Icon Library - Example: "C:\Program Files\CyberInstaller Suite 2008\Studio\Media\Icons"
Default location of the folder that contains the library of icons. It's possible change according to the project by step 18 "Run." In that folder you can put all your favorite icons to make them easily accessible in step 18 "Run", to assign an icon to the self-extracting executable created.
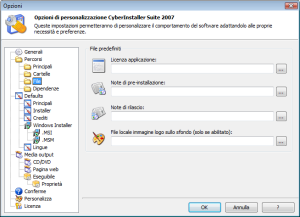
Options that modify the
default locations for the files most used (and you might want to reuse
several times).
License application - Example: "D:\My Documents\<Username>\Clipboard\Licenza.txt"
Text file used as a license for the application that you distribute it through the package created. You can still change it for each project through step 3 "Documentation".
Notes pre-installation - Example: "D:\My Documents\<Username>\Clipboard\Readme.txt"
Text file used as notes displayed before the installation for the application that will be distributed through the package created. You can still change it for each project through step 3 "Documentation".
Release Notes - Example: "D:\My Documents\<Username>\Clipboard\Rilascio.txt"
Text file used by default as notes appear at the end of the installation for the application that you distribute it through the package created. You can still change it for each project through step 3 "Documentation".
Local file image logo in the background - eg "D:\My Documents\<user name>\Images\Logo Silver CyberTech.gif"
Image files used by default as the logo of the application that will be distributed through the package created. You can still change it for each project by step 2 "Interface CyberInstaller".
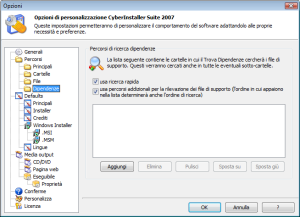
Contains the folders where it will search for the application support files by running the tool find employees or insertion of a dependency for the current project (menu dependent).
Use the Quick Search
Options that modify the default values for the main
parameters of the installation package (see Step
1 - General parameters), which then will be used to create
each new
project. Using these settings you will avoid having to
manually enter the same preferences for each new project.
Name
-- Eg: "CyberInstaller Suite
2008"
Software title that will be distributed.
Some programs include
the version number in the title of the software, others prefer to omit
it. Text entered here is
essential and will be used by CyberInstaller
Study for the package/current project (for example, as the
name you give the file the first rescue plan, it is suggested the text
inserted here). In addition to the end user will be shown during
the installation process, which then will refer to this text in order
to know the name of which is about to install.
Note: Do not use the following characters: \ /: *? "<> |
Author's name or the
software company that distributes software that will be distributed.
The input text is crucial, as
will be shown to the end user during the installation process and
consequently they will refer to it to contact the vendor of the
application that is about to install.
Install read-only - Default: No
If checked the installation
will be in "read only".
This means that the end user may not modify any
parameters when installing the software (eg the destination folder,
etc..), Just accept the default parameters proposed, established during
the creation of the package. This parameter allows
you to create installation wizard where the user is limited only to the
parameters set when creating the package, avoiding in this way,
possible errors due to unorthodox choices of the user. This parameter,
when used in conjunction with "Installing
minimal interaction" allows you to create installation wizard
where the user is limited only to the parameters set when creating the
package, avoiding in this way, possible errors due to unorthodox
choices of the user.
Note:
this parameter takes effect only with the Professional version of CyberInstaller.
Installing silently - Default: No
If checked the installation
will be in silent mode, ie does not display anything the user only the
necessary steps to collect the information (destination folder). Will be used only the
parameters set when creating the package.
Note:
this parameter takes effect only with the Professional version of CyberInstaller.
If checked the installation
will be displayed to the user only the necessary steps to collect the
information (destination folder) and any other documentation (if
inserted). This reduces the
installation wizard to the sole request of the destination folder,
removing the burden to the end user to answer questions at times
outside his jurisdiction.
This parameter, when used in
conjunction with "Remove
read-only" allows you to create installation wizard where the
user is limited only to the parameters set when creating the package,
avoiding in this way, possible errors due to unorthodox choices user.
Note:
this parameter takes effect only with the Professional version of CyberInstaller.
System roll-back - Default: Yes
If
checked will activate the system roll-back of CyberInstaller.
This system is the ability for the end user to
restore any components of
the system overwritten during the installation (such as OCX controls,
libraries, ActiveX, etc..) Simply by removing the software installed. If you do not enable the system to roll-back,
removing the software may not recover files overwritten, because the
replaced versions have been stored. Conversely, ratings in the installation phase will
create a folder called "Roll-back" in your chosen destination/confirmed
by the user, which will copy all the files overwritten components,
allowing the restoration being removed. In any case, will always
enable the end user, both during installation that being removed, the
system roll-back (during installation only if the parameters "Remove read-only", "Install minimal interaction"
or "Silent Installation"
are not enabled).
Restarting Windows - Default: No
If checked at the end
of the installation process you will be prompted to restart the system.
This can be useful on occasions when you need a
forced restart Windows to activate the changes made to the system
during installation of the software. Normally you never need to reboot the system. In all cases, the
user will receive, to confirm restarting the system or the conclusion
of the installation without reboot.
Delete credits SilverCyberTech - Default: No
If checked the claims
of the author of CyberInstaller
(SilverCyberTech) will be removed from the window "Information" of CyberInstaller. This
can be useful if you do not want to confuse the user with references to
a manufacturer that has nothing to do with the distribution of the
package in question, but you want the only credits display of your own
(ie the text entered in the "manufacturer/author
application" and values "Custom Credit"
in step documentation).
Note:
If this option is enabled, but no credits are
added to the custom step "Documentation"
button "?" not be present
during the installation process.
Note: this parameter takes effect only with the Professional version of CyberInstaller.
Hide details
of installation/removal - Default: Yes
Stand-alone package [checkbox] - Default: Yes
Options that set the default
values to customize the interface CyberInstaller
(see Step 2 - Interface installer).
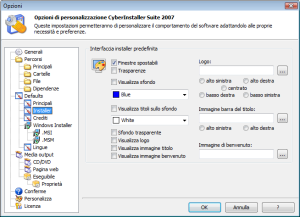
Transparencies - Default: No
If checked the effects of CyberInstaller will be enabled. This means that the windows in the background will appear semi-transparent, revealing the underlying portion of the screen (the desktop or other windows that are open). Otherwise the windows on the second floor will only be hidden by those in the foreground, with no special effect of transparency.
Show
background -
Default: No
If I checked enabled the background behind the main window CyberInstaller during the entire process of installation / removal, and you can change the color or image of the logo.
Background
Color -
Default: Blue [blue]
Color behind the main
window CyberInstaller
during the entire process of installation/removal.
Show titles
in the background -
Default: No
Note:
this parameter is taken into account during the installation/removal
only if the parameter "Show Background" is enabled.
Title Color background - Default: White [White]
Color of the background behind the titles of the main window CyberInstaller. It's better should select a color that is legible on the selected color for the background.
Transparent
background -
Default: False
If checked the background of CyberInstaller be semitransparent, revealing the desktop and any open windows below.
Note:
this parameter is taken into account during the installation/removal
only if the parameters "Effects
of transparency"
and "Show Background" is
activated.
This field should be shown an image file (full path) is valid and exists to be used as the logo of the software or the author. The image appears on the background of CyberInstaller. The file can only be of type: BMP, GIF or JPEG. Leave blank or entering a nonexistent file, the logo will not appear.
Note:
This parameter is considered only if the parameter "Show Background" is enabled.
Local file image title bar - Example: "D:\My Documents\<Username>\Images\SilverCyberTech.gif"
In this field should be shown an image file (full path) is valid and exists that appears on the title bar of the window of the process of installation/removal.. The image appears on the background of CyberInstaller. The file can only be of type: BMP, GIF or JPEG. Leave blank or entering a nonexistent file, the logo will not appear. The selected file must be of the size listed, or a warning message will indicate the problem (and the reporting appears in the panel analysis in real time the package).
Local file image image Welcome - Example: "D:\My Documents\<Username>\Images\SilverCyberTech.gif"
In this field should be shown an image file (full path) is valid and exists to be used as a welcome picture of the software or the author. The image appears to the left of the welcome window. The file can only be of type: BMP, GIF or JPEG. Leave blank or entering a nonexistent file, the logo will not appear. The selected file must be of the size listed, or a warning message will indicate the problem (and the reporting appears in the panel analysis in real time the package).

Options that modify credits default installation package (see Step
3 - Documents) which then will be used for each new project.
Use custom credits - Default: No
If unchecked allows the placing of loans customized (to taste), displayed in a special window when the user clicks the button "?" during the process of installation/removal. For use in combination with the option "Delete credits SilverCyberTech" pitch "General Parameters": if it is not enabled, it will become automatically with the approval of the option "Use custom credits. If the option "Delete SilverCyberTech credits" is enabled but "Use custom claims" no, the button "?" in the box of CyberInstaller not be visible.
Enabling this option enable all the related options below.
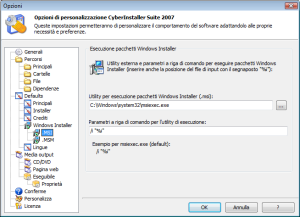
Options to change the behavior of the utility system that lets you run Windows Installer packages (.msi) incorporated in the installation package.
Packages. Msi
packages are generated by Windows Installer and executable are not
normal, for their execution (so to install the package) is required to
use this utility on any installation of Windows that is installed
Windows Installer. Such packages can be incorporated in the package
created by CyberInstaller
Studio, only to be performed during installation by using CyberInstaller
utility shown here, passing the command-line parameters specified.
Execute Package Utility for Windows Installer (.Msi) - Default: C:\WINDOWS\system32\msiexec.exe
Path and name of the executable can run the packages. Msi. He always positioned <Windows>\<System>\MsiExec.exeParameters to the command line utility to execute - Default: /i "%i"
Indicates the parameters to run the utility at the time indicated.
Options to change the behavior of the utility to
convert merge modules
(.msm) Winodws Installer packages to Windows Installer executable
(.msi).
The utility default is "msm2msi.exe" CyberInstaller
Suite in a distributed application that allows the
conversion of the most common merge modules.
Note: Not all merge
moudels can be converted using this utility (such as Crystal Reports),
you can resort to external utilities best suited for this purpose.
Utility to convert merge modules (.msm) in Windows Installer packages (.msi) - Default: <Windows CyberInstaller Suite>\Studio\Add-Ins\Msm2Msi\msm2msi.exe
Path and name of the executable to convert the merge modules (file .msm) in Windows Installer packages (.msi).Command line parameters for conversion utilities - Default: "% i"
Indicates the parameters to run the utility at the time of conversion.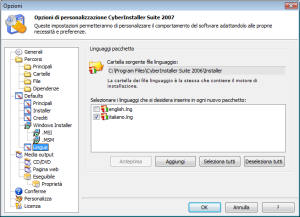
Options that allow you to select the default language to be included with each new installation package. It's possible also add new languages (. Lng) in addition to those installed by default with CyberInstaller Suite. From step 16 "Languages" will always be possible to change the language selected for the current project.
Language source file folder - Default: <Windows installation CyberInstaller Suite>\Installer
View the folder that contains the language files (. Lng). It's the subfolder "Installer" located in one where it is installed CyberInstaller Suite. You can not change it, because the language file must be present in the same folder where Setup.exe (CyberInstaller).Select the languages you want to include in any new package - Default: english.lng (not selected), italiano.lng (selected)
Shows the languages currently installed. There are also four buttons: Preview displays the selected language (it is a text file opened with the program selected in the Major/File) Add install a new language, Select all automatically selects all the languages listed, Uncheck all automatically deselects all the languages listed.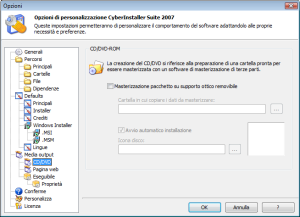
Options for the defaults on the preparation of a folder containing the installation package, ready to be burned through a third-party tools (CyberInstaller Studio does not directly burns the folder you created). You can change these values selectively for the current project through the step 17 "Media output".
Burning package on removable optical media - Default: No
Enable the options for creating the burn folder.Folder in which to copy the data to be burned
Default folder in which you will copy all files in the package. The folder will then be prepared to be referred to burn through third-party software.Autostart installation - Default: Yes
Causes, burning the folder to CD/DVD or other removable media, the installation is done automatically (you will create a special file autorun.inf). Also true enabled the "disk image".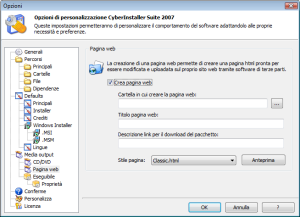
Options to select default values relating to the creation of a web page properly formatted, ready to be used in your site. This page represents a typical download page, where you can download the installation package. You can change these values from step 17 "Media output".
Create web page - Default: No
By checking this option will enable the options for the creation of web page downloads.Folder in which to create the web page
Folder where the html file will be created and placed the self-extracting executable file containing the installation package itself. The user, click on the download link (created automatically in the html page), will begin the downloading of the executable package.Title page
Title that will be assigned to the web page created. This title apprirà in the title bar of the browser of users reaching your webpage browsing the site in which it was placed.Description link to download the package
Description of the link will start the download package. This description will appear just before the download link, in order to alert the user with any additional information.Page Style - Default: Classic.html
From this list you can choose the layout of the web page among those proposals (Classic, Elegant CyberBlue, elegant portals big full-centered, elegant portals big, elegant portals, Elegant, Standard Black, Standard).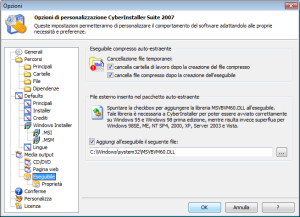
Options that modify the behavior of CyberInstaller Studio during the creation of the self-extracting executable package.
Note:
These settings apply only to the
current project and are then stored in the project file (.
Csp) corresponding (in practice do not apply as the default for all new
projects created).
Delete working folder after creating the compressed file - Default: Yes
Is automatically deleted then the workbook and all its contents after it was created the compressed file (the first stage of the process of creating self-extracting executable package). The compressed file contains the whole package and then the entire contents of the workbook is contained in that file.
Delete the compressed file after the creation of the executable - Default: Yes
Is automatically deleted the compressed file containing the package after it was created the self-extracting executable file (the second and final phase of the process of creating self-extracting executable package).
Add the following to the executable file - Default: Yes
Note:
The specified file is compressed before being added to the package and
will be unpacked in the temporary folder to unpack unpacked and placed
where you will also find the file Setup.exe (CyberInstaller).
Add the following to the executable file - Default: "<Windows system> \ MSVBVM60.DLL"
External file to be added to the package (it will
be compressed). The point of adding an external file to the package
comes from the fact that CyberInstaller
needs of virtual machines "Microsoft Visual Basic 6" to run properly on
Windows 95 and Windows 98 first edition ( that file is already present
rather than on operating systems: Windows 98 SE, ME, NT, 2000, XP,
Server 2003, Vista and Server 2008). Place the file
MSVBVM60.DLL package we made sure that CyberInstaller
laps correctly on older operating systems. If you are sure that the user's system already has
the library, you can avoid adding this file to the package by limiting
the size.
Note:
It's may be possible for any external file. The external file will be
unpacked in the user's system in the same folder where it will be
unpacked and positioned CyberInstaller
(Setup.exe).
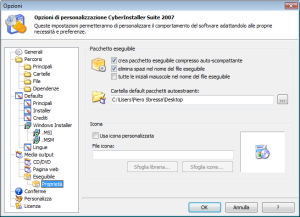
Options that modify the behavior of CyberInstaller Studio during the creation of the self-extracting executable package.
Create self-extracting compressed executable package - Default: Yes
Automatically creates a compressed self-extracting EXE file containing the installation package.Delete spaces in the name of the executable file - Default: Yes
Remove any spaces in the name given to the executable file.All capitalized in the name of the executable file - Default: No
Becomes the initial capitalization of all words that eventually make up the name of the executable.Self-Extractor packages default folder - Default: <Desktop user corrent>
Default path where you will create the executable file.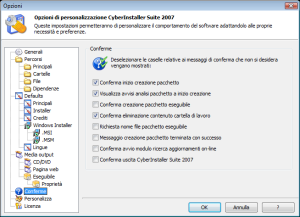
Options to specify
which operations CyberInstaller
Studio asks for confirmation before continuing.
If an option is
selected will be asked to confirm if it cleared the transaction
associated begins immediately.
Confirm start creating package - Default: Yes
If selected will be
asked to confirm before you start creating the package.
View alerts analysis package to start creating - Default: Yes
If selected will be asked to
confirm before you start creating the package if there are any alerts
in the panel analysis. Although not selected
in the event of critical reports will still display the warning message.
If selected will be asked for confirmation before creating the self-extracting (if selected in step 17 "Media Output") immediately after creating the installation package.
Confirm delete content Workbook - Default: Yes
If selected will be asked to confirm before deleting the contents of the workbook.
Request executable package file name - Default: No
If selected you will be asked the name of the executable file and the folder in which to create it (if selected in step 17 "Media Output") immediately after creating the installation package.
Message package creation finished successfully - Default: No
If selected message will appear that will inform the possible success of the process of creating the installation package.
Confirm start search form on-line updates - Default: No
If selected will be asked to confirm before it starts the search form update on-line (CISUpdater).
Confirm exit Cyber Suite Installer - Default: No
If selected will be asked for confirmation before exiting CyberInstaller Studio. Even if not selected, if the current project has not been saved (you will see an "*" in the title bar, next to the name of the project open), will still be asked if you want to save the changes.
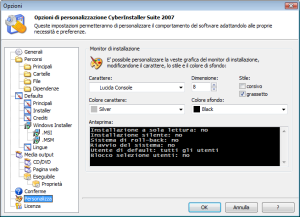
Options that change the look of the monitor setup CyberInstaller Studio.
Character - Default: "Lucida Console"
Font (font) used to display the messages in the monitor setup.
Note:
It's should select a fixed font to preserve tabs and alignments.
Size - Default: "8"
Size of the body of the text of the messages inside the monitor setup.
Italics - Default: No
Adds style "italic" to the specified character.
Bold - Default: Yes
Adds the style "bold" to the specified character.
Font Color - Default: "Silver"
Color of the text of the messages inside the monitor setup.
Note:
It's advisable to select a background color that is legible when
associated with the "background color" set.
Background Color - Default: "Black"
Background color of the monitor setup.
Note:
It's advisable to select a background color that is legible when
associated with the "color character set.
Preview
Preview your monitor setup, changed in real time based on the options selected, to get immediate feedback on how your monitor setup. It's possible enter any text, which will immediately take the settings.
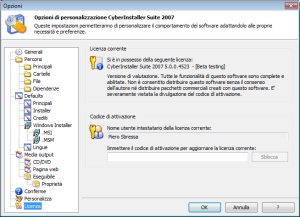
This tab displays the
license
currently used by the version of CyberInstaller
Suite in its possession.
From here you can enter the activation code
to register CyberInstaller
Studio, in order to change the license in Free
Personal/Professional. This is possible by
entering the activation
code (reported by SilverCyberTech
at the time of purchase) in the "Enter the activation code to change
the current license, and click the Unblock" button.
If you already have a registered copy of CyberInstaller Studio,
in the "Name of the current license holder" will display the holder of
the current license. To change the owner
(username), you must purchase a new license and enter the activation
code on (because, remember, one belongs to a single user license and
can not be used by different users).
Note:
To purchase a license registered (Personal/Professional) of CyberInstaller
Suite, send an email to the producer by clicking here.
Please note that using a professional license, there will
be limitations in using CyberInstaller
Suite, you will have access to all its advanced features
(silent installation, installing read-only, multilingual support, large
packages, destination folder extra Translator tool , Custom Icon
executable, custom credits, etc.). and you will have technical support
via email and/or mobile phone. Also you can create commercial packages,
which is impossible with the license free/not registered.
![]() See
also ...
See
also ...
![]() Creating a multilingual
package
Creating a multilingual
package
![]() Creating self-extracting compressed executables
Creating self-extracting compressed executables