![]() CyberInstaller
Studio - 13. Adding a component
CyberInstaller
Studio - 13. Adding a component
Clicking on the "Add" button in step 6 - "File Details" opens a window through which you can specify all the parameters of the file you want to install as part of the software to be distributed.
![]() Note: Do not
make the mistake of confusing the components of a
software with the files of their software. Indeed, while the
latter correspond to the files that make up the application (thus
created and / or assembled by the developer of the software), the
components are all the files needed to outline
the proper functioning of the software. These components (also called
dependencies) can be files of third parties (for example, ActiveX, OCX,
software libraries for the technologies adopted in software
development, etc..), But also support files such as images (icons,
bitmaps, etc. .), sounds, databases, etc.. without which the software to
be distributed will not work correctly. All of these files can be inserted through the step "Data", which allows, through
a consistent interface, to have on hand the whole package and see how
your target system is complete.
Note: Do not
make the mistake of confusing the components of a
software with the files of their software. Indeed, while the
latter correspond to the files that make up the application (thus
created and / or assembled by the developer of the software), the
components are all the files needed to outline
the proper functioning of the software. These components (also called
dependencies) can be files of third parties (for example, ActiveX, OCX,
software libraries for the technologies adopted in software
development, etc..), But also support files such as images (icons,
bitmaps, etc. .), sounds, databases, etc.. without which the software to
be distributed will not work correctly. All of these files can be inserted through the step "Data", which allows, through
a consistent interface, to have on hand the whole package and see how
your target system is complete.
All files inserted through the step "Data" (or a complete those
inserted one at a time in this step) may be associated with certain
parameters (such as maintaining records, or their copy mode), without
which they could not be installed correctly .
![]() CyberInstaller
Studio - 13.1 General Parameters component
CyberInstaller
Studio - 13.1 General Parameters component
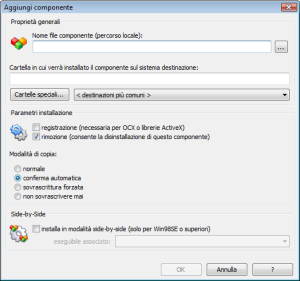 Name file component
[field] - Example:
"C:\Windows\System32\COMCTL32.OCX"
Name file component
[field] - Example:
"C:\Windows\System32\COMCTL32.OCX"
File name on the local disk (the system on which you are creating the package), including path. If the file does not exist the component will not be added to the list (and therefore not installed). As soon as you move from this field to another (after clicking the field when pressing TAB or by clicking in another field or button in the window), CyberInstaller Studio will automatically detect if the inserted file requires registration or not, by modifying appropriately the value of the check box.
... [Button]
Opens the Open dialog box/Select Files by which to select the file to be used as a component. Using this window will not need to type the path and file name manually. It's Use this button to avoid making a typo in danger, in this way, to insert a file that would be nonexistent. Use of the Open dialog box also allows you to select only the supported file types and automatically set the destination folder.
Folder in which you will install the component on the target system [field] - Example: "|$SystemPath$ |"
ID folder on the destination system, in which you want to be copied and installed the component. It's highly recommended to use the patterns of the system to refer to the folder, and this is the only way, indeed, to be sure that the folder exists on any system. The most common destination is the directory in which you installed the software ( "|$AppPath$|"), the Windows folder ("|$WinPath$|") and the system folder ("|$SystemPath$|"). When you enter a file name in the "Browse" will be set value automatically in this field, according to the original location of the file.
![]() Note: If you
enter destination as a folder, again using a pattern, a folder that
could not be present on the system where to install the package, think CyberInstaller Studio
automatically add this folder in "Folders"
(step 5) without it we should be concerned to do it manually. Eg: you want the component to be installed in the
destination folder in a subfolder called "Database" as the destination
folder you will place the pattern
"|$AppPath$|\Database". You will notice that after you press
the button "OK "folder" |$AppPath$|\Database"
will be immediately added to step
5.
Note: If you
enter destination as a folder, again using a pattern, a folder that
could not be present on the system where to install the package, think CyberInstaller Studio
automatically add this folder in "Folders"
(step 5) without it we should be concerned to do it manually. Eg: you want the component to be installed in the
destination folder in a subfolder called "Database" as the destination
folder you will place the pattern
"|$AppPath$|\Database". You will notice that after you press
the button "OK "folder" |$AppPath$|\Database"
will be immediately added to step
5.
Special Folders [button]
Allows you to open the dialog "special folder system" through which to select a pattern that represents a folder on the target user's system. This folder will be used as a destination for the installation of the component.
Most common destinations [list]
Allows you to select the most likely destination folder quickly and without the possibility of error. Selecting an item from this list will be automatically inserted pattern appropriate in the destination folder field.
![]() CyberInstaller
Studio - 13.3 Setup Parameters
CyberInstaller
Studio - 13.3 Setup Parameters
Registration [checkbox] - Default: --
If checked, the component will be registered during installation, immediately after the copy in the destination folder. Immediately after you inserted the name of the component file (once the field has lost focus), this parameter will be set automatically. The registration of a file is needed only in special cases (OCX, ActiveX, and libraries) and is a 'operation that informs the operating system on the file location. Without registration, the files that need not be used and, although the installation went successfully, the software will not work correctly. CyberInstaller Studio automatically detects if a file requires registration, but the method used is not infallible and some cases (though rather remote) is required to correct this manually.
Removing [checkbox] - Default: --
You can uninstall the selected component.
Copy mode [options
box] - Default:
Automatic Confirmation "
Indicates how the
file will be copied from the packet to the destination system and how
it should behave in case the engine installation files already present
on the target system. There are 4 modes of
copy:
| Normal | the decision to
overwrite any files already present on the same target system will be
entrusted to you (which is still a proposal recommended based on the
version of the file) |
| automatic
confirmation |
the decision to overwrite any files already present on the same target system will be made automatically based on the version of the file |
| Always
Overwrite |
a file already on your system, possibly the same destination will be overwritten in any case |
| not
overwrite ever |
a file already on your system, possibly the same target will never be overwritten |
![]() Note:
The search for such components will need a software is often difficult
and complex, CyberInstaller
this study
is to help developers with the tool find
employees who will try to detect automatically all the
necessary components to their software, starting from the source
project ( in Visual Basic, Delphi, in any language. Net) or directly
from the executable. Unfortunately, this tool (like other similar
software) is often not 100% accurate, especially when the analysis is
completed as from thIt's executable, and it could happen that are
reported as dependency files are not strictly necessary or that are not
reported but other files necessary/useful. The complexity of the operation is compounded by
the possible misinterpretation of parameters to bind to components,
such as the need to register or not. All this leads to
having to test as much as possible their installation packages on
several different software configurations, and is often necessary to
proceed by trial and error before he could produce a package working
perfectly under all conditions.
Note:
The search for such components will need a software is often difficult
and complex, CyberInstaller
this study
is to help developers with the tool find
employees who will try to detect automatically all the
necessary components to their software, starting from the source
project ( in Visual Basic, Delphi, in any language. Net) or directly
from the executable. Unfortunately, this tool (like other similar
software) is often not 100% accurate, especially when the analysis is
completed as from thIt's executable, and it could happen that are
reported as dependency files are not strictly necessary or that are not
reported but other files necessary/useful. The complexity of the operation is compounded by
the possible misinterpretation of parameters to bind to components,
such as the need to register or not. All this leads to
having to test as much as possible their installation packages on
several different software configurations, and is often necessary to
proceed by trial and error before he could produce a package working
perfectly under all conditions.
To minimize the number of
failures can read up on the technologies used during the development of
software to distribute and files needed for its proper installation. Every programmer should in
fact be fully aware of what is included during the planning application
in your development environment, and according to the manufacturer's
documentation of the technology used (or third-party components used)
to include in the installation package necessary files.
Side-by-Side [checkbox] - Default: --
when enabled by installing
side-by-Side (for Windows 98SE or later), a special technique that
allows to circumvent the problem of the simultaneous presence of
different versions of the same library/ActiveX, without overwriting the
files already present on the system where the target but installing it
next to the executable that uses it and without registering (you must
specify the executable associated with the component to be installed in
side-by-side). In this way, any applications
already installed using the old component will continue to function
effectively (for normal installation, however, would use the new
component that could, at worst, break compatibility with the past,
going to affect the proper functioning of 'applicaizone uses it).
Associated executable [field list] - Default: if the parameter Side-by-Side is enabled, the default is the first executable included in the package
indicates the name of the executable file associated with the component installed in side-by-side. If the component is not installed in side-by-side, this field will be disabled.
 CyberInstaller
Studio - 13.4. CyberInstaller
Studio - 13.4. Esempi
Examples
CyberInstaller
Studio - 13.4. CyberInstaller
Studio - 13.4. Esempi
Examples
Example 1: You
want to install the component "COMCTL32.OCX", located on our system in
"C:\Windows\System32". This file should be recorded (CyberInstaller Studio
will understand by himself) and made it to decide whether to overwrite CyberInstaller or
not the component in this case it is an older version on the target
system.
The values of the parameters
will be:
Filename component = "C:\Windows\System32\COMCTL32.OCX"
Directory in which you installed the component = "|$SystemPath$|"
Registration = Yes
Copy Mode =
automatic confirmation
Example
2: You want to install the "Anagrafica.mdb",
located on our system in "F:\My Documents\Software\Management". This
file should not be recorded (CyberInstaller
Studio will understand by himself) and contains version
information . Also you want to be installed in the subfolder "Database"
in the destination folder you selected, and as such files may already
have been installed by a previous version, you want to avoid being
incorrectly overwritten do not lose the data entered by the user:
The values of the parameters
will be:
Filename component = "F:\My Documents\Software\Management\Anagrafica.mdb"
Directory in which you installed the component = "|$AppPath$|\Database"
Registration = No
Automatic
confirmation does not overwrite = never
Example
3: you want to install the "Readme.txt" located
on our system in "F:\My Documents\Software\Management." This file
should not be recorded (CyberInstaller
Studio will understand by himself) and contains version
information . Also you want to be installed in the subfolder
"Documentation" of the destination folder you selected and you want to
make sure that goes to overwrite any file that already exists, so you
always update to the latest version:
The values of the parameters
will be:
Filename component = "F:\My Documents\Software\Management\Anagrafica.mdb"
Directory in which you installed the component = "|$AppPath$|\Database"
Registration = No
Forced overwrite
= automatic confirmation
![]() See
also ...
See
also ...