![]() CyberInstaller
Studio - 43. Wizard
added external application
CyberInstaller
Studio - 43. Wizard
added external application
Clicking on the menu Tools/"New Application
Wizard", or using the specific activity
of the step 8 "External Applications",
or via the button at the same pace, it will open the window "Wizard add external application"
that through a wizard that will assist you in 4 easy steps will guide
you quickly adding an external application to the package.
Using this wizard is especially recommended for less experienced users, since it will add to the package an external application running quickly and safely.
This tool is also activated
at any time by simply pressing keys <Ctrl
+ P>.
![]() CyberInstaller
Studio - 43.1. Step
1: Executable application
CyberInstaller
Studio - 43.1. Step
1: Executable application
 The
first step of the wizard
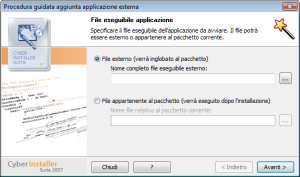
added external application is: Executable application.
The
first step of the wizard
added external application is: Executable application.
Here you can specify
the file of the application you want to add to the package. It's possible select
any executable file present in your hard disk (in this case, the
application will be part of the package) or a file of the package.
External file (will be part of the package) [option]
Select this option if you want to specify a file on your hard disk and not the package or to the destination.Full name external executable file [field] - Example: "C:\Documents and Settings\<username>\Documents\MDAC_TYP.EXE"
This field will be
enabled, along with the button on the side, after selecting the option
"External File". In this field you can write directly to the file
name that will be incorporated in the package, or select it using the Open dialog box (recommended),
referred through the button "..." right.
Note:
The uploaded file will be part of the package, which then increase its
size accordingly.
Files belonging to the package (will be done after installation) [option]
Select this option if you want to refer to a file already included in the package. This file can be used when installed on the target system (the first would be there).File name on the current package [field] - Eg: "|$AppPath$|\Studio\CyberInstallerStudio.exe"
This field will be enabled, along with the button
on the side, after selecting the option "files in the package." In this field you can directly scriverre the
filename of the package, referring to systems designed using the patterns, or select it using the Browse window package
(recommended), referred through the button "..." right.
Note:
The uploaded file can only be used after installation.
![]() CyberInstaller
Studio - 43.2. Step
2: Application description
CyberInstaller
Studio - 43.2. Step
2: Application description
 The
second step of
the wizard
is added to the
external application: Application
description.
The
second step of
the wizard
is added to the
external application: Application
description.
Application description [field] -- Eg: "CyberInstaller Studio 2007"
Here you can specify a short description with the application you want to add. It's important that the description should give a more detailed and concise as possible the name of the application, so that the user is informed as possible.
![]() CyberInstaller
Studio - 43.3. Step
3: The carrying
CyberInstaller
Studio - 43.3. Step
3: The carrying
 The
third step of
the wizard, adding
external application is: Run mode.
The
third step of
the wizard, adding
external application is: Run mode.
You must specify the type of execution for the application you intend to run as synchronous or asynchronous.
Synchronous,
the installation looks [option]
Asynchronous,
the installation continues [option]
![]() CyberInstaller
Studio - 43.4. Step
4: Timing
CyberInstaller
Studio - 43.4. Step
4: Timing
 The fourth step of
the wizard added
external application is: Timing.
The fourth step of
the wizard added
external application is: Timing.
You must specify when you want to run the application in relation to the process of isntallazione true: sooner or later.
Before
installing [option]
![]() See
also ...
See
also ...