![]() CyberInstaller
Studio - 44. Wizard
added link
CyberInstaller
Studio - 44. Wizard
added link
Clicking on the menu
Tools/"New Connection Wizard" or using the specific activity of step
13 "Links", or via the button at the same pace, it will open
the window "add
connection wizard" that, through a wizard that will assist
you in 4 easy steps will guide you quickly adding a link (link or
shortcut) to the package.
Using this wizard is especially recommended for less experienced users, since the package will add a link to a working file of the package quickly and safely.
This tool is also activated
at any time by simply pressing keys <Ctrl
+ L>.
![]() CyberInstaller
Studio - 44.1. Step
1: Type link
CyberInstaller
Studio - 44.1. Step
1: Type link
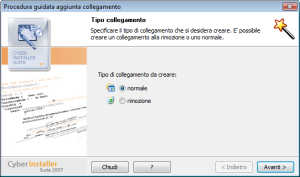
 The first step of the
wizard link
is added: Type link.
The first step of the
wizard link
is added: Type link.
Here you can specify whether
the connection you are creating is normal
(ie, points to a file that is included in the package), or is to remove (that is the
special link that initiates the removal of the package)
. .
Normal [option]
Select this option if you want to create a shortcut that points to any of the files in the current package. It's possible create a shortcut to an executable, allowing you to start quickly, or to a file or a document of the documentation associated with an executable file included in the package.Removal [option]
Select this option if you
want to create a special link that will launch immediately remove the
current package. You will not have to worry about anything: the link
will be created with all the necessary parameters in an absolutely
transparent. For this reason, indeed, the "Next" button the wizard
will change to "end", because you will not need further input.
![]() CyberInstaller
Studio - 44.2. Step
2: File pointing
CyberInstaller
Studio - 44.2. Step
2: File pointing
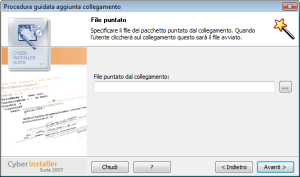 The second step of the wizard added link
is: File pointed.
The second step of the wizard added link
is: File pointed.
File pointed to by the link [field] -- Eg: "|$AppPath$|\Studio\CyberInstallerStudio.exe"
Here you can type the path, referred to the current package (thus using the patterns of the system), which will direct link. To avoid making typing errors and having to remember the path to memory, it is recommended to use the dialog "Browse package", recalled by pressing the button "..." located to the right of this field.
![]() CyberInstaller
Studio - 44.3. Step
3: Description
CyberInstaller
Studio - 44.3. Step
3: Description
 The third step of the
wizard added link
is: Description.
The third step of the
wizard added link
is: Description.
You must specify a
description for the shortcut you want to create. The description is
fundamental because it is the name of the link is because it is the
only text that the user will see. Accordingly, the
description should make it clear immediately what the user will
initiate the connection.
Description of the connection [field] -- Eg: "CyberInstaller Studio 2008"
In this field you can type a description for the current connection. The description must be extended, although brief, and be as readable as possible for the end user. By default it is proposed the name of the file pointed to, without extension and with a capital letter.![]() CyberInstaller
Studio - 44.4. Step
4: Destination
CyberInstaller
Studio - 44.4. Step
4: Destination
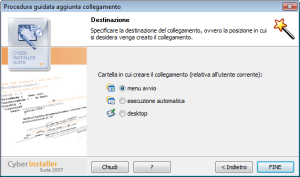 The fourth step of the wizard added link
is: Destination.
The fourth step of the wizard added link
is: Destination.
Here you must specify
where you want the shortcut that you create. It's possible choose between
the 3 folders usually more used to this purpose: the "Start Menu", the
group folder "Startup" or "Desktop user selected". According to the
selected destination is set to confirm the creation of the connection:
no confirmation in the case of the "Start Menu", an explicit request by
the user in all other cases. You can always change
this parameter from the window of manual
modification of a link.
Start Menu
[option]
Startup
[option]
Desktop
[option]
![]() See
also ...
See
also ...